Plant Tissue Testing

Determine crop uptake and limiting nutrients during key growth stages through out the growing season.
ORDER TISSUE TESTING

Benefits of Plant Tissue Testing

It is beneficial to start a tissue testing program early and track nutrient levels through out the season before the problem occurs. Monitor the high yield areas as they have a higher demand and uptake a greater amount of nutrients, ensure they are not short tissue results allow for in season adjustments to prevent nutrient deficiencies and maximize yield potential. A regular tissue testing program allows for better understanding of your crop needs which compliments soil sampling and soil health information. In-season monitor can provide proper field knowledge to adjust future fertility program preventing hidden hungers in your crop.

Timely

Scalable

Informed Agronomic Decisions

Plant Tests

PT1
Nitrogen, Phosphorus, Potassium, Magnesium, Calcium, Sodium, Sulphur, Boron, Zinc, Manganese, Iron, copper, and Aluminum (This test should be used for any leaves)
 
PT2
Nitrogen, Phosphorus, Potassium, Magnesium, Calcium, Sodium, Sulphur, Boron, Zinc, Manganese, Iron, copper, and Aluminum + Nitrate-N (This test should be used for petioles)
 
PT4
Specialty Tests (for fruits, tubers, ginseng, carrots, turnips, etc…)
Nitrogen, Phosphorus, Potassium, Magnesium, Calcium, Sodium, Sulphur, Iron, Aluminum, Manganese, Boron, Copper, and Zinc

Plant Tissue Test Reports

Understanding Your Plant Analysis Report

Plant Tissue Tests can help identify if an essential nutrient in the plant is within the expected normal sufficiency range for that particular stage of growth during the season. This offers the opportunity to address the deficient nutrients during the growing season, or elect to adjust next season’s fertility program.

Resource Material

Welcome to our resource material on plant tissue testing—an invaluable guide for farmers, agronomists, and agriculture enthusiasts alike. Unravel the science behind plant tissue analysis, exploring its significance in gauging nutrient levels, diagnosing deficiencies, and fine-tuning fertilization strategies.

Plant Tissue Testing FAQs

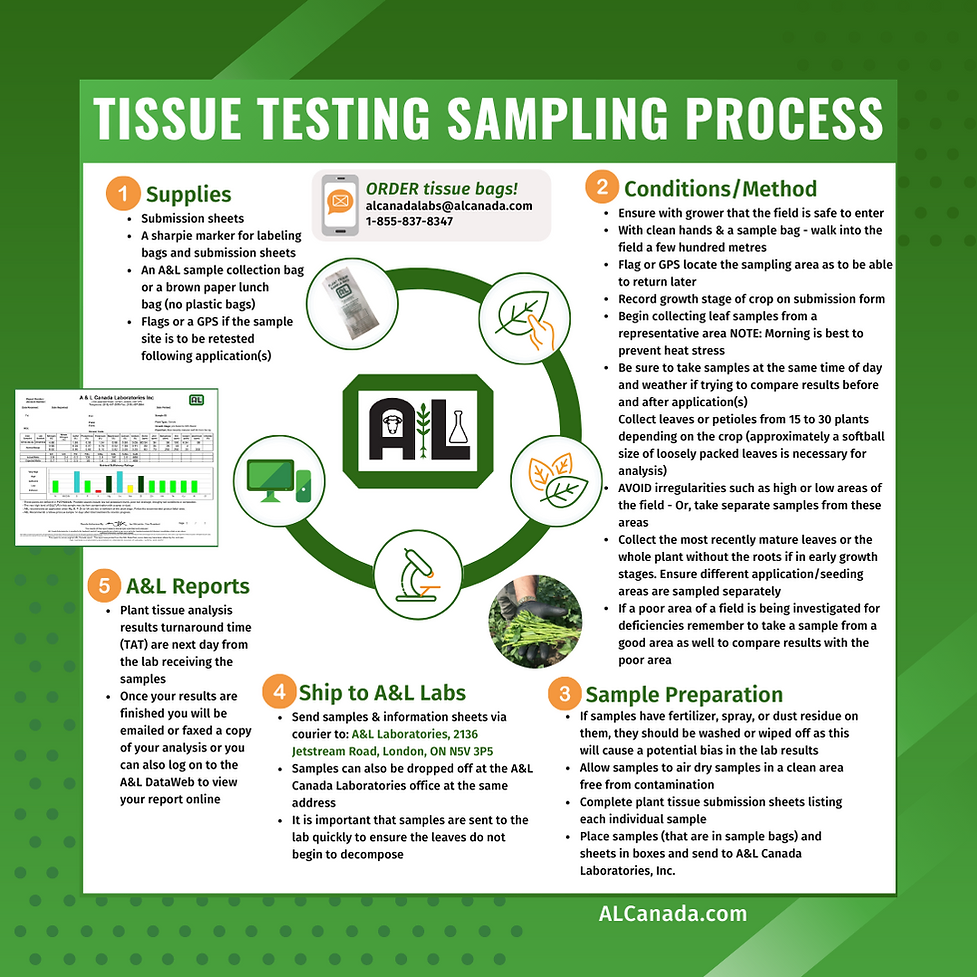
A: Ensure with grower that the field is safe to enter

With clean hands & a sample bag – walk into the field a few hundred metres 

Flag or GPS locate the sampling area as to be able to return later

Record growth stage of crop on submission form

Begin collecting leaf samples from a representative area NOTE: Morning is best to prevent heat stress. Be sure to take samples at the same time of day & weather if trying to compare results before & after application(s)

Collect leaves or petioles from 15 to 30 plants depending on the crop 

AVOID irregularities such as high or low areas of the field – OR, take separate samples from these areas

Collect the most recently mature leaves or the whole plant without the roots if in early growth stages Ensure different application/seeding areas are sampled separately

If a poor area of a field is being investigated for deficiencies remember to take a sample from a good area as well to compare results with the poor area

A: Approximately 2 cups of leaves or a large paper bag

Most analysis require a minimum of 2 grams of dried & ground 

Make Deveron your trusted Tissue Sampling provider

Let's TaLK